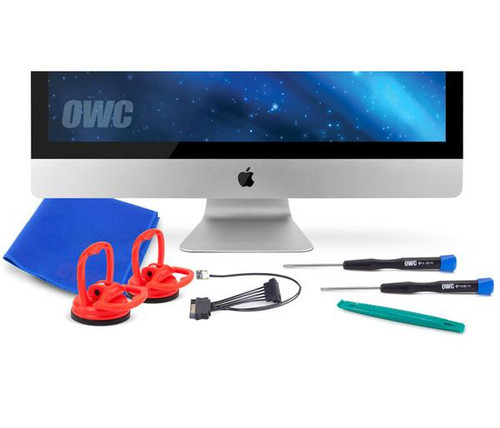
Description
OWC DIY Complete Hard Drive Upgrade Kit for 27-inch iMac (Late 2012 - Mid 2019)
- Required for any drive installed into the main drive bay.
- Eliminate fan noise and maintain correct system fan control when upgrading your 2012 or later iMac.
- The only iMac HDD upgrade option on the market certified to pass the Apple Hardware Test.
- Fixes firmware incompatibility issues with third party hard drives.
- Engineered in-house and backed by OWC's award-winning customer support.
Improve Performance and Capacity. Upgrade Your iMac with Confidence.
OWC's in-line solution is the only hardware digital thermal sensor on the market allowing a third-party SATA drive to be installed in your iMac. A convenient, plug-and-play cable, the In-line Digital Thermal Sensor eliminates fan noise and maintains proper system fan control through the iMac's System Management Controller. This innovative device is designed specifically for the iMac, requires no software hacks and ensures compatibility with Apple's built-in diagnostic processes.
Using an OWC Internal HDD DIY Kit (sold separately), replace your iMac's original hard drive with a high-capacity hard drive or a lighting fast SSD with a NewerTech Adaptadrive, for dramatic upgrades in storage capacity or data speed while maintaining the original system's fan and diagnostic performance.
Already have the tools? Then purchase just the OWC In-line Digital Thermal Sensor.
Note: Before attempting to perform this installation, please watch the install video below to determine your ability to perform this complex upgrade.
Professional installation is highly recommended.
OWC assumes no responsibility for damage that may occur during the installation. Technical support for this DIY product consists only of the OWC Install Video.
Includes
1 x OWC In-line Digital Thermal Sensor Cable
2 x OWC 2-1/4" Suction Cup
1 x Torx T10S Driver
1 x Torx T8S Driver
1 x Nylon Pry Tool (Spudger)
1 x OWC Screen Removal Tool
1 x OWC Blue Microfiber Screen Cleaning Cloth
1 x 27" iMac Adhesive tape set for proper display resealing
NOTE: This kit contains consumable and/or one-time-use components and therefore is non-refundable if opened. If you have any concerns about your ability to perform the upgrade, you can return the unopened kit for a refund.
Professional installation is highly recommended.
Instructions for use Display Mount Adhesive Strips - PDF file
NOTE: This kit contains consumable and/or one-time-use components and therefore is non-refundable if opened. If you have any concerns about your ability to perform the upgrade, you can return the unopened kit for a refund.
Professional installation is highly recommended.

Compatibility
27-inch Late 2013 iMac14,2 - A1419 - EMC - 2639 | 3.2GHz i5, 3.4GHz i5, 3.5GHz i7
27-inch Late 2014 iMac15,1 - A1419 - EMC - 2806 | 3.5GHz i5, 4.0GHz i7
27-inch Mid 2015 iMac15,1 - A1419 - EMC - 2806 | 3.3GHz i5, 3.5GHz i5, 4.0GHz i7
27-inch Late 2015 iMac17,1 - A1419 - EMC - 2834 | 3.2GHz i5, 3.3GHz i5, 4.0GHz i7
27-inch Mid 2017 iMac18,3 - A1419 - EMC - 3070 | 3.4GHz i5, 3.5GHz i5, 3.8GHz
27-inch Early 2019 iMac19,1 - A2115 - EMC - 3194 | 3.0GHz i5, 3.1GHz i5, 3.7GHz i5, 3.6GHz i9
Reviews(6)
-
iMac 27" SSD upgrade kit
Can’t say I wasn’t nervous about taking my iMac apart, but everything needed is in the kit and the instructions are clear. It was an upgrade I had been meaning to do for some time and the final results were better than expected. Boot time went from 63 Seconds (1TB mechanical drive) to 14 with a 512SSD. I used a heat gun on low to warm the back (not the screen) which made cutting through the screen adhesive tape much easier. Due to the SSD drive being so light I used adhesive Velcro strips to stick the drive in place. Take your time and take extra care when disconnecting and re connecting the two screen cables.
-
Needs a warning or product update or both...
I had cause to use one of these upgrade kits on a 2017 iMac and used this because they are sold for '2012 models and later'. For those looking to do similar be aware that Apple has changed the location of the microphone from previous years. This means that the tapes supplied for the bottom front edge completely block the mike rendering it useless. To then get the screen out again is extremely risky as these tapes are fresh and sticky. The supplied cutting wheel does not work well on new tapes and slips out of the gap chipping the glass. I broke my screen trying to get it out. I'm not happy. :(
-
Almost everything you need to do the job
Bought this kit to replace the dying HDD in my 2015 iMac with an SSD. It's a very good quality kit (I've reviewed the thermal sensor on its own) and it does the job. The OWC video is fine, although the modifications required for later iMacs that have the microphone in a different place seems a bit of a bodge, leaving some of the middle part of the display un-adhered (you are advised to remove 10cm of a bottom strip). In the video it shows the adhesive strips being aligned with screwdrivers through the holes in the strips to the holes in the chassis and I assumed that the two screwdrivers supplied would be used for this but they are too thick to go into the holes. I had to go and find two very small pins (hex keys actually) to do this part. Perhaps they could include a couple of plastic pins in the kit to do this to save the user having to go and rummage for small screwdrivers/pins? With the stress of having to part the screen from the chassis (which actually went well despite my worries) I wasn't happy with just doing the modification and closing it up before checking it worked, so I put the new strips on (having removed all traces of the original strips from both the chassis and the display) but didn't remove the second protection strip. I then laid the iMac it on its back, connected the display and laid it on the chassis, and checked that everything worked as expected (it did, apart from I had to re-make the Fusion drive, as it showed two separate drives). I then carefully lifted the display with the ribbon cables still attached, pulled off the protection strips from all the adhesive and finally fitted the display to the chassis, as in the video. I'd recommend lining up the bottom edge VERY carefully with the chassis before lowering it onto the strip. When I did mine, the adhesive on the display grabbed the chassis edge while it wasn't quite lined up. I was reluctant to pull it off and re-locate it in case it pulled part of the adhesive strip off the display and rippled it (the strip) which might have caused a bulge of strip, so my display is about 10 thou (0.25mm) offset at the bottom. It looks fine but I can feel it when I run my fingers down the edge. Hey ho, it's stuck very firmly and doesn't affect the operation.
-
Hard drive upgrade kit
Kit worked really well ensuring the hard drive swap was really straightforward. A must have if you plan on changing the hard drive for an SSD one
-
Tape _almost_ as original
The kit works great. The only downside is that the tape makes it more difficult to reopen the computer (if that will be needed). The original tape used on the iMac is thicker and has a fluffy center, which makes the sliding into the tape with the "pizza-cut-tool" rather easy. Removing a screen taped with the OWC kit tape is rather more difficult than that. It seems, however, that all tape kits available are similar in this respect. PS Next time I'm opening an iMac I will plug the computer in and try to restart it when all the tape pieces are in place, but before I actually attach the screen to the sides and upper tape strips. Last time I accidently tugged on a cable (while fiddling around with removing the plastic on the tape pieces) and detached the cable from the motherboard and thus needed to reopen the computer (and order a new tape kit…) DS
-
OWC COMPLETE HARD DRIVE UPGRADE KIT
Did the job as required. Screen adhesive tape handily marked up. *NB I found I didn't need the iHeavy Duty Suction Cups to carry out the task.


")